Hayward OmniLogic Troubleshooting Guide: A Comprehensive Overview
Navigating the complexities of your pool system requires a detailed guide; this resource offers expert tips and solutions for common issues, ensuring optimal performance.
The Hayward OmniLogic system represents a significant advancement in pool and spa automation, offering integrated control over various functions like pumps, heaters, lights, and sanitization. This sophisticated system aims to simplify pool maintenance and enhance the overall ownership experience. However, like any complex technology, the OmniLogic can encounter issues requiring troubleshooting;
Understanding the system’s architecture is crucial for effective problem-solving. The OmniLogic controller acts as the central hub, communicating with individual components via a network. Sensors play a vital role, providing real-time data for precise control and monitoring. Common challenges include power failures, communication errors between components, and sensor malfunctions. This guide provides a comprehensive approach to diagnosing and resolving these issues, empowering users to maintain their OmniLogic system efficiently; Remember to USE ONLY HAYWARD GENUINE REPLACEMENT PARTS for optimal performance and safety.
Understanding the OmniLogic Control Panel
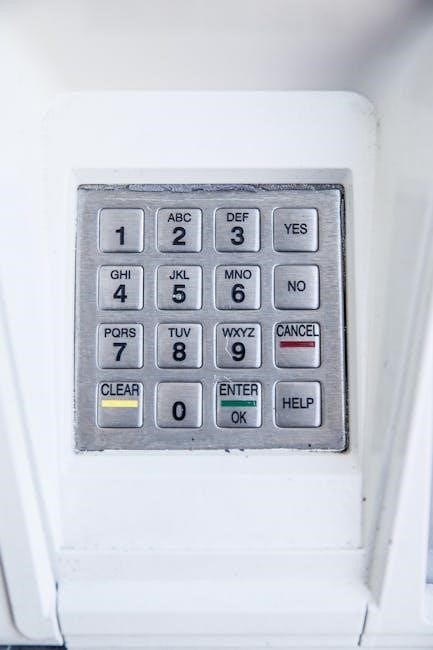
The OmniLogic control panel serves as the primary interface for monitoring and adjusting your pool system. Familiarizing yourself with its layout and functions is essential for effective troubleshooting. The display panel presents critical information, including system status, error codes, and sensor readings. Navigating the menu allows access to various settings and diagnostic tools.
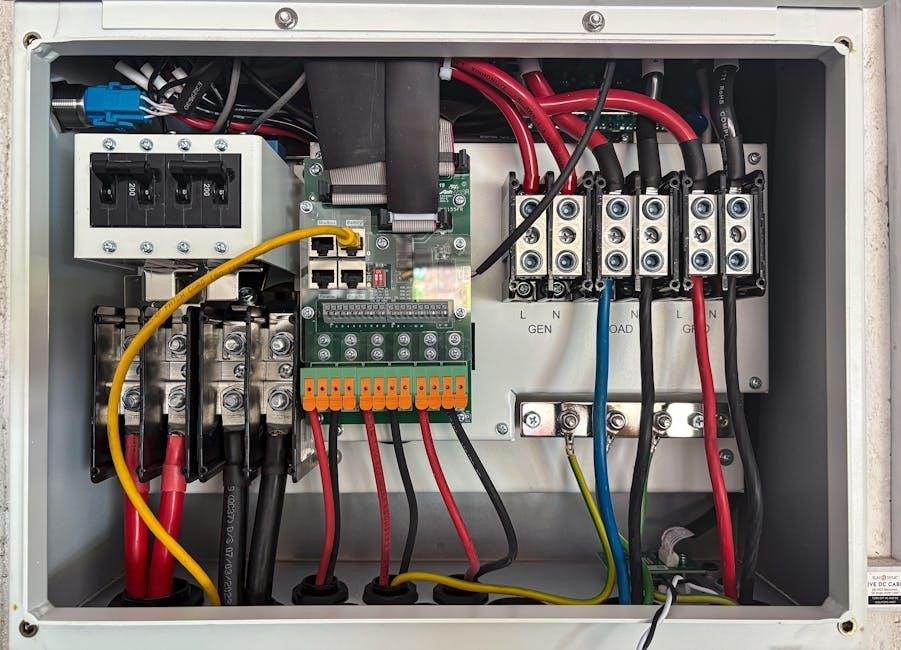
Error codes are particularly important, providing clues about the nature of the problem. Identifying these codes is the first step in diagnosing sensor issues or communication failures. The panel also allows manual control of individual components, useful for isolating problems. A green colored terminal marked Grounding is located inside the wiring compartment, crucial for electrical safety. Always refer to the user manual for detailed explanations of panel functions and error code definitions. Proper understanding of the control panel significantly streamlines the troubleshooting process.

Common Hayward OmniLogic Issues & Troubleshooting
Addressing frequent problems like power failures, communication errors, and pump malfunctions is key to maintaining a smoothly operating pool system with this guide.
Issue 1: System Not Powering On
Encountering a completely unresponsive OmniLogic system can be alarming, but often stems from simple causes. Initial troubleshooting focuses on verifying the power supply. Confirm the system is receiving voltage; a multimeter is invaluable for this step.
Next, meticulously check the circuit breaker dedicated to the OmniLogic. A tripped breaker is a common culprit. Reset it if necessary, but if it trips again immediately, a short circuit may exist, requiring professional attention.
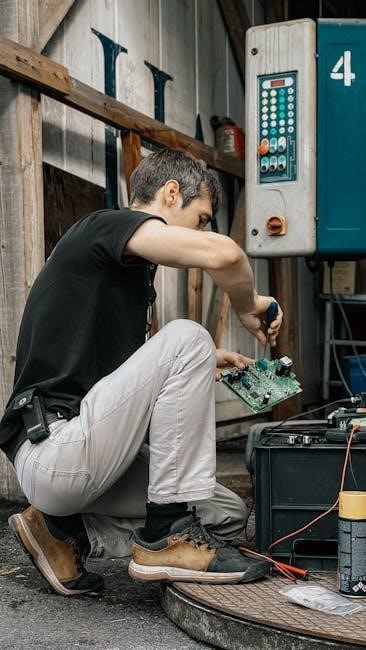
Inspect all wiring connections, ensuring they are secure and free from corrosion. Loose connections can interrupt power flow. Pay close attention to the grounding terminal – a secure ground is vital for safety and proper operation. Remember to disconnect power before inspecting wiring! Genuine Hayward replacement parts are crucial for reliable repairs.
Troubleshooting Power Supply Problems
Addressing power supply issues requires a systematic approach. Begin by verifying the input voltage to the OmniLogic controller, ensuring it matches the specified requirements. Utilize a multimeter to accurately measure the voltage at the power terminals.
Inspect the power supply itself for any visible signs of damage, such as burnt components or swollen capacitors. If damage is apparent, replacement is necessary – always use a genuine Hayward replacement part. Check the fuse within the power supply; a blown fuse indicates a potential overload or short circuit.
Confirm the power supply is securely mounted and properly grounded. A loose connection or inadequate grounding can lead to intermittent power issues. Remember safety first – disconnect power before any inspection or repair work.
Checking the Circuit Breaker & Wiring
Start by verifying the circuit breaker dedicated to the OmniLogic system hasn’t tripped. Reset it fully, even if it appears to be in the ‘on’ position. Inspect the wiring connections at the breaker panel, ensuring they are tight and free from corrosion. Loose connections can cause intermittent power loss.
Trace the wiring from the breaker to the OmniLogic controller, carefully examining the entire length for any signs of damage – frayed insulation, cuts, or exposed wires. Pay close attention to any connections within junction boxes. Ensure all wire nuts are secure and properly sized.
Confirm the grounding wire is securely connected to both the breaker panel and the OmniLogic’s grounding terminal. Proper grounding is crucial for safety and system stability. Remember to disconnect power before inspecting or working with any electrical wiring.
Issue 2: Communication Errors
Communication errors within the Hayward OmniLogic system often manifest as unresponsive components or error messages on the control panel. These issues typically stem from disruptions in the signal pathways between the controller and other devices like pumps, valves, or sensors. Initial troubleshooting involves verifying the physical connections of all components.
Ensure all cables are securely plugged into their respective ports on both the OmniLogic controller and the connected devices. Inspect the cables themselves for any signs of damage, such as cuts or frayed wires. Consider the distance between components; excessively long cable runs can sometimes contribute to signal degradation.
If the problem persists, a controller reset may be necessary to re-establish communication. Attempting a reset can often resolve temporary glitches; Document any error codes displayed before resetting, as they can provide valuable clues for diagnosis.
Diagnosing Communication Failures Between Components
Pinpointing communication failures requires a systematic approach. Begin by isolating the affected component – is it a single pump, a specific valve, or multiple devices experiencing issues? Check the OmniLogic’s display panel for specific error codes related to the failing component; these codes offer crucial diagnostic information.
Next, visually inspect the wiring connections to that component. Confirm that the wires are securely fastened and free from corrosion. Utilize a multimeter to test the continuity of the communication wires, ensuring there are no breaks or shorts. Pay close attention to the cable runs, looking for potential sources of interference.
If wiring appears sound, attempt to manually control the component directly (bypassing the OmniLogic) to determine if the issue lies within the component itself or the communication pathway. Document all findings to aid in further troubleshooting.
Resetting the OmniLogic Controller
Before attempting a reset, understand that this will revert the controller to its factory default settings, potentially erasing customized programming. Therefore, document your current settings beforehand if possible. A soft reset, achieved by cycling the power to the OmniLogic (turning off the breaker for 30 seconds), often resolves minor glitches and communication errors.
For more persistent issues, a full factory reset may be necessary. This typically involves accessing a specific menu within the controller’s interface – consult your OmniLogic manual for the precise procedure, as it can vary depending on the model. Be prepared to reconfigure all settings, including pump schedules, heater setpoints, and sensor calibrations.
After the reset, carefully monitor the system to ensure all components are functioning correctly. If problems persist, further troubleshooting may be required.
Issue 3: Pump Not Running
A non-operational pump is a common concern with Hayward OmniLogic systems. Initial checks should focus on verifying power supply to the pump itself, not just the controller. Inspect the dedicated circuit breaker for the pump and confirm it hasn’t tripped. Carefully examine all wiring connections at the pump and the OmniLogic controller, looking for loose connections or corrosion.
If power is confirmed, investigate potential pump motor issues. Listen for any humming sounds, which might indicate a capacitor problem or a motor winding fault. A seized impeller can also prevent the pump from starting; attempt to manually rotate the impeller (with power OFF) to check for obstruction.
Remember to always prioritize safety when working with electrical components.
Verifying Pump Power & Connections
Begin by confirming the pump’s dedicated circuit breaker hasn’t tripped. Reset it even if it appears to be in the ‘on’ position. Use a multimeter to verify voltage at the pump’s wiring connections – you should read the expected voltage for your system (typically 120V or 240V). Carefully inspect all wiring connections at both the pump and the OmniLogic controller.
Look for loose wires, corrosion, or any signs of damage. Ensure all connections are tight and secure. If corrosion is present, clean the connections thoroughly before re-tightening. A visual inspection can reveal obvious issues, but a multimeter provides definitive confirmation of power delivery.

Remember to disconnect power before working with any wiring!

Checking for Pump Motor Issues
If power and connections are verified, the pump motor itself may be the culprit. Listen for any unusual noises – humming, grinding, or clicking – when the pump attempts to start. A lack of sound could indicate a completely failed motor, while strange noises suggest internal problems.
Manually attempt to turn the pump impeller (with power OFF, of course!). It should rotate freely. Resistance indicates a potential blockage or bearing failure. Inspect the pump basket for debris; a clogged basket can strain the motor. Consider a capacitor test – a failing capacitor is a common cause of pump motor failure.
Motor replacement may be necessary if issues persist, and professional assistance is recommended for this task.
Sensor Troubleshooting
Sensors are vital for accurate system operation; malfunctions disrupt performance. Identifying issues through error codes is key to restoring optimal functionality and efficiency.
Importance of Sensors in the OmniLogic System
The Hayward OmniLogic system relies heavily on a network of sensors to maintain precise control over pool and spa functions. These sensors continuously monitor critical parameters like water temperature, flow rate, and pressure, relaying this information back to the central controller. Accurate sensor readings are absolutely essential for efficient operation of the pump, heater, and other components.
Without functioning sensors, the OmniLogic cannot make informed decisions, potentially leading to imbalances in water chemistry, inefficient energy usage, or even equipment damage. For example, a faulty temperature sensor could cause the heater to run continuously, wasting energy and potentially overheating the water. Similarly, a malfunctioning flow sensor might prevent the system from activating essential features. Therefore, understanding the role of each sensor and knowing how to troubleshoot them is paramount for maintaining a healthy and enjoyable pool experience. Regular sensor checks contribute significantly to the longevity and reliability of your entire OmniLogic system.
Identifying Sensor Issues via Error Codes
The Hayward OmniLogic system employs a sophisticated error code system to pinpoint the source of malfunctions, including those related to sensors. These codes, displayed on the control panel, act as diagnostic signals, guiding users and technicians towards specific problem areas. Recognizing these codes is the first step in effective troubleshooting.
For instance, an error related to the flow sensor will display a unique code, distinct from one indicating a temperature sensor issue. Decoding these messages allows for targeted investigation, saving time and preventing unnecessary component replacements. Common error codes often relate to signal interruptions, out-of-range readings, or complete sensor failures. Consulting the OmniLogic manual is crucial for a comprehensive understanding of each code’s meaning and recommended corrective actions. Promptly addressing error codes prevents minor issues from escalating into more significant and costly repairs, ensuring continued system reliability.
Decoding Common Error Codes (e.g., Flow Sensor, Temperature Sensor)
A “Flow Sensor” error typically indicates a lack of water movement detected by the system, potentially due to a clogged filter, closed valve, or a malfunctioning sensor itself. The OmniLogic might display a specific code like “FL-01” or similar, signaling this issue. Addressing this requires checking the entire circulation pathway.
Conversely, a “Temperature Sensor” error, often coded as “TEMP-02” or a variation, suggests an inaccurate or absent temperature reading. This could stem from a faulty sensor, loose connection, or even environmental interference. Verifying the sensor’s physical integrity and wiring is paramount. Remember to consult your OmniLogic manual for the precise error code definitions specific to your model. Accurate decoding is vital for efficient troubleshooting and restoring optimal pool system operation, preventing further complications.
Troubleshooting Specific Sensor Types
Addressing sensor malfunctions requires a targeted approach. For “Flow Sensor” issues, begin by inspecting the sensor for debris or damage. Verify proper seating and electrical connections. If the problem persists, a replacement sensor might be necessary. “Temperature Sensor” troubleshooting involves checking for physical damage, corrosion, or loose wiring. Ensure the sensor is fully submerged and not exposed to direct sunlight.
Similarly, “Pressure Sensor” problems often relate to blockages or air in the system. Inspect the filter, pump basket, and plumbing for obstructions. Calibrating the sensor, if possible, can also resolve inaccuracies; Always refer to the Hayward OmniLogic manual for specific sensor testing procedures and recommended replacement parts. Proper diagnosis and repair ensure accurate readings and optimal system performance.
Flow Sensor Troubleshooting
When encountering flow sensor issues within the Hayward OmniLogic system, initial steps involve a thorough physical inspection. Check the sensor body for any visible debris, cracks, or damage that could impede accurate readings. Verify the sensor is securely seated within its housing and that all electrical connections are clean and tight. A loose connection can easily cause intermittent or inaccurate data transmission.
Furthermore, examine the plumbing surrounding the sensor for obstructions like leaves or sediment. If a blockage is present, carefully remove it. If the sensor continues to malfunction after these checks, consider testing its output signal with a multimeter, comparing it to the specifications in the OmniLogic manual. Replacement with a genuine Hayward flow sensor is often the most effective solution for persistent problems.
Temperature Sensor Troubleshooting
Addressing temperature sensor malfunctions in your Hayward OmniLogic system begins with verifying its physical integrity. Inspect the sensor probe for any signs of corrosion, damage, or fouling, as these can significantly affect accuracy. Ensure the sensor is properly immersed in the water flow and isn’t exposed to direct sunlight or other heat sources that could skew readings.
Next, check the wiring connections to the sensor, ensuring they are secure and free from corrosion. A multimeter can be used to test the sensor’s resistance, comparing the reading to the specifications outlined in the OmniLogic documentation. If the resistance is outside the acceptable range, or if the sensor consistently reports inaccurate temperatures, replacement with a genuine Hayward temperature sensor is recommended to restore accurate pool temperature monitoring and control.
Pressure Sensor Troubleshooting
Diagnosing issues with the pressure sensor within your Hayward OmniLogic system requires a systematic approach. Begin by visually inspecting the sensor and its associated plumbing for any leaks, blockages, or physical damage. Debris accumulation can lead to inaccurate pressure readings, impacting filter operation and system performance.
Subsequently, verify the sensor’s wiring connections, ensuring they are secure and free from corrosion. Utilize a multimeter to test the sensor’s output signal, comparing it to the expected values under specific pressure conditions as detailed in the OmniLogic manual. If the sensor consistently provides erratic or incorrect readings, or fails the multimeter test, replacement with a genuine Hayward pressure sensor is crucial for maintaining optimal filtration and protecting your pool equipment from potential damage.

Advanced Troubleshooting & Maintenance
Proactive maintenance, including system resets and firmware updates, alongside diligent wiring checks, ensures long-term reliability and peak performance of your OmniLogic system.
Performing a System Reset
A system reset on your Hayward OmniLogic controller can often resolve minor software glitches and restore normal operation. Before initiating a reset, carefully document your current settings – pump schedules, heater setpoints, and any customized programming – as a reset will revert the system to its factory defaults. This documentation is crucial for efficient reconfiguration post-reset.
The reset procedure typically involves accessing the controller’s menu via the control panel. Navigate to the “Settings” or “System” menu, and locate the “Reset” or “Factory Reset” option. Confirm your selection, understanding that all customized settings will be erased. Allow the system several minutes to complete the reset process; do not interrupt power during this time.
Following the reset, you’ll need to re-enter all your desired settings. Refer to your documented settings to streamline this process. Test all system functions – pumps, heaters, lights – to ensure they are operating correctly. If issues persist after a reset, further troubleshooting may be required, potentially indicating a hardware problem.
Updating the OmniLogic Firmware
Maintaining current firmware is vital for optimal performance and access to the latest features and bug fixes on your Hayward OmniLogic system. Firmware updates often address compatibility issues and enhance system stability. Before beginning, ensure a stable power supply and internet connection, as interruptions during the update can cause serious problems.
The update process usually involves downloading the latest firmware file from the Hayward website and transferring it to a USB drive. Insert the USB drive into the OmniLogic controller’s designated port and navigate to the “Settings” or “System” menu on the control panel. Select the “Firmware Update” option and follow the on-screen prompts to initiate the update.

Allow the update to complete uninterrupted; this may take several minutes. Once finished, the controller will typically restart automatically. Verify the new firmware version in the “System Information” menu. If the update fails, consult the Hayward support documentation or contact a qualified technician for assistance.
Checking and Cleaning Wiring Connections
Reliable operation of your Hayward OmniLogic system hinges on secure and corrosion-free wiring connections. Regularly inspect all wiring within the control panel and at component connections for signs of looseness, corrosion, or damage. Loose connections can cause intermittent operation or complete system failure, while corrosion impedes electrical conductivity.
To check connections, carefully disconnect power to the system before opening the control panel. Gently tug on each wire to ensure it’s firmly seated in its terminal. If corrosion is present, carefully clean the terminals with a wire brush or electrical contact cleaner. Ensure the cleaner is safe for use on electrical components.
A crucial safety feature is the grounding terminal, typically green, inside the wiring compartment. Verify this terminal is securely connected to reduce the risk of electric shock. Reconnect all wires firmly and close the control panel before restoring power.
Grounding Terminal Importance & Verification
The grounding terminal, usually identified by its green color within the wiring compartment, is a critical safety component of the Hayward OmniLogic system. Its primary function is to provide a low-resistance path for fault currents, minimizing the risk of dangerous electrical shock to users and protecting the equipment from damage.
Proper grounding diverts stray electrical currents safely to the earth, preventing voltage buildup on metallic parts of the system. To verify correct grounding, visually inspect the wire connected to the terminal, ensuring it’s securely fastened and free from corrosion. Trace the grounding wire to confirm it’s connected to a properly grounded electrical outlet or grounding rod.
Regular verification of the grounding connection is essential for maintaining a safe operating environment. Failure to properly ground the system can create a significant electrical hazard, so professional inspection is recommended if you are unsure.
Using Genuine Hayward Replacement Parts
Maintaining the integrity of your Hayward OmniLogic system hinges on utilizing genuine Hayward replacement parts. While aftermarket alternatives may seem cost-effective, they often lack the precise engineering and rigorous testing that ensure compatibility and optimal performance with your OmniLogic controller.

Non-genuine parts can introduce unforeseen issues, potentially causing system malfunctions, reduced efficiency, and even voiding your warranty. Hayward designs its components to work seamlessly together, guaranteeing reliable operation and longevity. Using incorrect parts can lead to communication errors, sensor inaccuracies, or premature component failure.
Always refer to the Hayward parts catalog or consult with a qualified pool technician to identify the correct replacement part number for your specific OmniLogic model. Investing in genuine Hayward parts safeguards your investment and ensures continued peace of mind.

Safety Precautions & Warnings
Prioritize electrical safety and avoid using the OmniLogic with incompatible equipment like fire pits; a grounded terminal is vital for shock prevention.
Electrical Safety Guidelines
Working with electrical systems demands utmost caution. Always disconnect power at the circuit breaker before attempting any troubleshooting or maintenance on the Hayward OmniLogic system. Never handle wiring with wet hands or while standing in a damp location, as this significantly increases the risk of electric shock.
Inspect all wiring for damage – frayed insulation, loose connections, or corrosion – and replace any compromised components immediately. Ensure the grounding terminal, located inside the wiring compartment, is securely connected to a properly grounded electrical source. This grounding connection is crucial for diverting fault currents and minimizing the potential for hazardous electrical conditions.
If you are uncomfortable or unfamiliar with electrical work, do not attempt to perform repairs yourself. Contact a qualified electrician or a certified pool service professional for assistance. Ignoring these safety guidelines can lead to severe injury or even fatality. Remember, safety is paramount when dealing with electrical equipment.
Avoiding Use with Incompatible Equipment (e.g., Fire Pits)
The Hayward OmniLogic system is specifically designed for controlling pool and spa equipment. Utilizing it with incompatible devices, such as fire pits or related heating appliances, is strictly prohibited and presents significant safety hazards. These devices often require different voltage and control mechanisms, potentially leading to malfunctions, overheating, or even fire.
Attempting to integrate the OmniLogic with unsupported equipment can void the warranty and compromise the system’s intended functionality. The control panel’s programming and safety features are tailored for pool/spa applications and are not equipped to manage the unique demands of other appliances.
Always refer to the Hayward OmniLogic manual for a comprehensive list of compatible equipment. Prioritize safety and adhere to the manufacturer’s guidelines to ensure the longevity and reliable operation of your pool system. Using only approved components safeguards against potential damage and ensures a secure environment.
This troubleshooting guide provides general information and should not be considered a substitute for professional advice. While we strive for accuracy, pool systems are complex, and individual setups may vary. Incorrectly attempting repairs can lead to further damage or safety hazards.
Hayward Industries is not responsible for any issues arising from self-performed repairs based on this guide. If you are uncomfortable with any troubleshooting step, or if the problem persists after following these instructions, immediately contact a qualified and licensed pool technician.
Electrical work should only be performed by certified professionals. Always prioritize safety and adhere to local electrical codes. For complex issues or warranty claims, contacting Hayward customer support directly is recommended. Seeking expert assistance ensures proper diagnosis and repair, protecting your investment and maintaining a safe pool environment.